image to stl
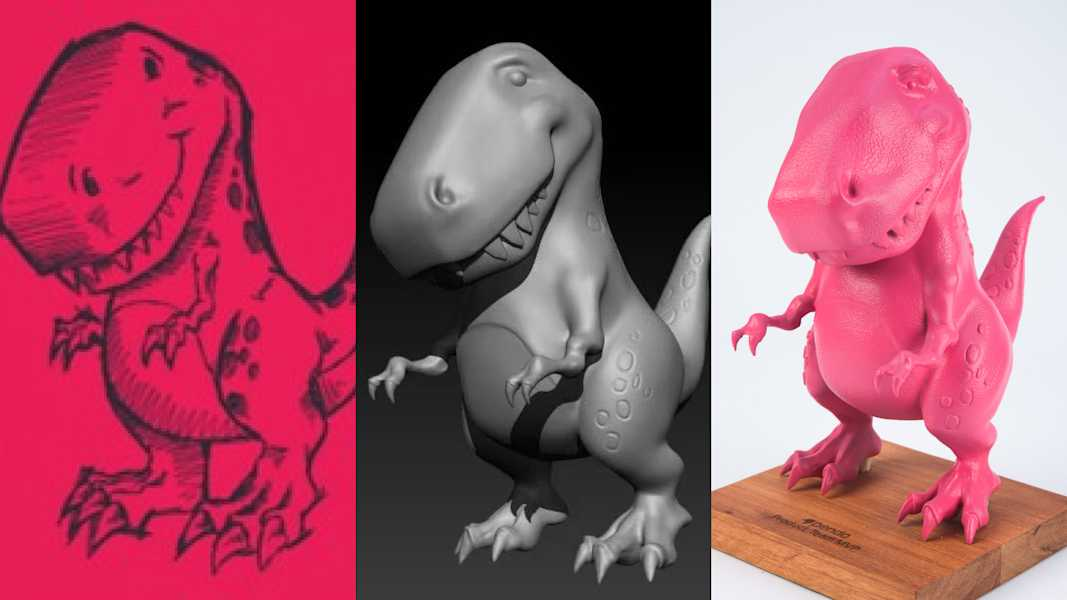
Turning a flat picture into a 3D object sounds like something from a movie. However, with an image to stl tool, you can actually do this at home! It is a fun way to bring your favorite memories or drawings to life. Many people use an image to stl converter to make custom gifts, jewelry, or cool desk toys. The process is much easier than it used to be. You do not need to be a professional designer to get started. All you need is a clear photo and the right software to help you convert image to stl formats. This guide will walk you through everything you need to know to create your very own image to stl file without any stress.
Quick Details: Image to STL Conversion Table
| Feature | Description |
| Main Process | Converting 2D images (JPG/PNG) into 3D mesh files. |
| Common File Types | JPG, PNG, BMP (Input) to STL (Output). |
| Primary Goal | Creating a 3D printable image to stl file. |
| Difficulty Level | Beginner-friendly with online tools. |
| Popular Uses | Lithophanes, 3D portraits, and custom logos. |
| Estimated Time | 2 to 10 minutes depending on detail. |
What Exactly is an Image to STL Converter?
An image to stl converter is a special program that looks at the colors and shapes in your photo. It then turns those details into a 3D shape. Think of it like a digital sculptor that uses your picture as a map. When you use an image to stl tool, the software assigns height to different parts of the image based on how dark or light they are. This creates a surface that a 3D printer can understand. It is a fantastic way for beginners to start 3D printing because you do not have to learn complex drawing skills. You just upload a file and let the computer do the hard work for you.
How to Choose the Best Image to STL Tool
Not all tools are the same when you want to convert image to stl files. Some are very simple and work right in your web browser. Others are professional programs that you download to your computer. If you are just starting out, look for a free image to stl converter that has a preview window. This lets you see what your 3D model will look like before you save it. A good tool should handle different types of pictures, like high-quality photos or simple sketches. Making sure the tool is easy to use will save you a lot of time and help you create a better image to stl file.
Read more: sosoactive
The Secret to Getting a Clean Image to STL File
To get the best image to stl result, you need to start with a high-contrast picture. This means the image should have very clear dark and light areas. If the photo is blurry or has too many busy colors, the image to stl converter might get confused. I always suggest using a black and white photo if you can. This makes it much easier for the software to decide which parts should be tall and which should stay flat. When you convert image to stl with a clean source, your 3D printer will produce a much smoother and more detailed object that looks professional.
Step-by-Step Guide to Convert Image to STL
The first step is to pick your favorite photo. Next, open your chosen image to stl converter and upload the file. You will usually see some settings that let you change the thickness or the size of the model. Once you are happy with the settings, click the button to convert image to stl. It usually takes just a few seconds to process. After that, you can download your brand new image to stl file. It is a good idea to check the file in a 3D viewer to make sure there are no holes or weird bumps. This simple workflow makes the image to stl process accessible to everyone.
Understanding Lithophanes and 3D Portraits
One of the coolest ways to use an image to stl workflow is making lithophanes. A lithophane is a thin piece of plastic that looks like a blurry mess until you hold it up to a light. Once the light shines through, the photo appears in beautiful detail! This happens because the image to stl converter creates different levels of thickness. The thicker parts block more light, while the thinner parts let light pass through. When you convert image to stl for this purpose, you are creating a unique piece of art. Creating a lithophane image to stl file is a popular project for birthdays and holidays.
Common Problems When You Convert Image to STL
Sometimes things do not go perfectly when you try to convert image to stl. You might notice that the model looks too spikey or has rough edges. This often happens if the original photo has “noise” or tiny dots in the background. To fix this, you can use a photo editor to smooth out the background before using the image to stl converter. Another issue is making the model too thin to print. Always check the base thickness in your image to stl tool. Ensuring your image to stl file is sturdy will prevent it from breaking when it comes off the 3D printer bed.
Best Settings for Your Image to STL Converter
When using an image to stl converter, you will see options like “Invert” or “Threshold.” If your 3D model looks inside-out, try clicking the invert button. This flips which parts are high and which are low. For a standard image to stl project, a base height of 2 or 3 millimeters is usually safe. If you want more detail, you can increase the resolution, but this will make your image to stl file much larger and slower to download. Finding the right balance will help you convert image to stl quickly while keeping all the important details of your original picture.
Software vs. Online Tools for Image to STL
Many people wonder if they should use a website or a downloaded program for an image to stl project. Online tools are great because they are fast and do not require installation. They are perfect for a quick image to stl converter task. However, if you have a slow internet connection, downloading software might be better. Professional software often gives you more control when you convert image to stl, such as adding frames or text. No matter which you choose, the end goal is always the same: a perfect image to stl file that is ready for your 3D printer.
Creative Ideas for Your Next Image to STL File
There are so many things you can do once you know how to use an image to stl tool. You can turn your child’s drawings into 3D keychains. You can also take a picture of a company logo and convert image to stl to make a custom sign. Some people even take maps of mountains and use an image to stl converter to make 3D terrain models. These projects are wonderful because they are personal and unique. Every image to stl file you create is a chance to learn something new about 3D design and printing. The possibilities are truly endless!
Why High Resolution Matters for Image to STL
If you want your 3D print to look amazing, resolution is key. A low-quality photo will result in a blocky image to stl file. When you use an image to stl converter, it tries to capture every pixel. If the pixels are large and blurry, the 3D model will be too. I always recommend using a photo that is at least 1000 pixels wide before you convert image to stl. This ensures that the small details, like eyes or hair, show up correctly. High-quality input leads to a high-quality image to stl output, making your final 3D printed object look like a work of art.
Conclusion:
Creating a 3D model from a simple photo is an exciting way to explore technology. By using an image to stl converter, you bridge the gap between 2D art and 3D objects. Whether you want to convert image to stl for a school project or a personal gift, the tools available today make it very simple. Remember to start with a clear, high-contrast photo for the best results. Once you have your image to stl file, you are just one step away from holding your creation in your hand. Give it a try and see how easy the image to stl process can be!
Frequently Asked Questions (FAQs)
1. Is it free to use an image to stl converter?
Yes, there are many free websites that allow you to convert image to stl without paying any money. Some might ask for a small fee if you want very high-resolution files, but most basic tools are totally free.
2. What file types can I turn into an image to stl file?
Most tools accept common picture formats like JPG, PNG, and BMP. Once the tool finishes its work, it will give you an image to stl file that you can use in 3D printing software.
3. Do I need a 3D printer to use an image to stl tool?
You do not need a printer to create the file! You can use an image to stl converter just to see what your photos look like in 3D. If you want to print it later, you can send the file to a printing service.
4. Why does my image to stl file look flat?
This usually happens if the photo does not have enough shadows or highlights. To fix this, try increasing the “depth” or “height” setting in your image to stl software to make the 3D effect stronger.
5. Can I convert image to stl with a color photo?
Yes, you can! However, the image to stl converter will usually change the colors into shades of gray first. It uses the brightness of the colors to decide how tall each part of the 3D model should be.
6. Is an image to stl file safe for my computer?
Generally, yes. Just make sure you are using a trusted image to stl converter website or software. STL files are standard 3D files and do not contain harmful scripts, so they are very safe to handle.